|
This document explains how to configure default design settings such as
skins and color schemes for admin and users' control panels.
Changing Look& Feel in your admin control panel will affect all end
users in your H-Sphere system.
In HS version 2.4, Control Panel interface design underwent significant modifications:
- New designs (skins), XPressia and XPressia Lite, were added,
with a dropdown menu panel on the top of the page.
- The obsolete Text-Based skin was completely removed from CP interface.
- Instead of the Text-Based skin,
it is provided a possibility to choose the Text Links mode
from the Choose Iconset select box, with text-only links instead of icons
in the Quick Access page.
To change the Look& Feel of the control panel, do the following:
- Select Design Settings from the Look and Feel menu.
- On the page that appears select the default skin from the Choose Design box.
- Click the Modify button.
- On the page that appears, change the design settings:

- Users can choose this design: this option determines whether
this design becomes available to your end users.
If none of the designs is enabled, H-Sphere sets Left Menu design as default.
- New users will get this design as default: enabling this option
will change default design for your end-users and switch it off for all other designs;
- Choose another design: select another design to modify.
Notes:
1. In versions before 2.3 Left Menu skin can't be disabled.
Starting from version 2.3, it can be disabled for users just like other skins.
2. Starting from HS 2.4, you may choose
the XPressia or XPressia Lite skins. XPressia Lite is specially designed to be used
if your browser works slowly with XPressia.
- Change control panel color and image set in the Color Scheme Setting section.

Important: You can change the color scheme, image set and icon set for
Left Menu skin, whereas for Text Based and No Menu skins only Icon Set can be changed.
- Color Scheme: select a color scheme and click Apply.
- Image Set: select another image set and click Set.
Image Set standards can't be customized.
- Default Icon Set for User: select the icon set that will
be default for your end users and click Set.
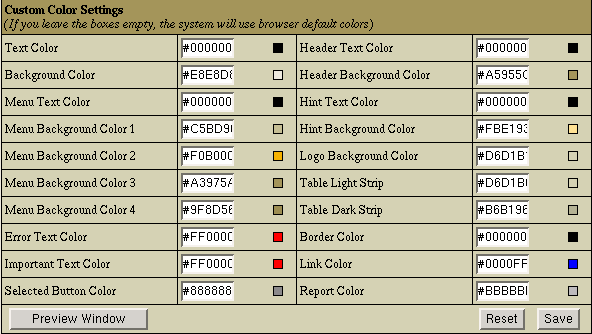
- Create your own custom color scheme by changing default color schemes.

- Click Preview Window to see how your settings will effect users' control panel.
- Click Reset to return to default color scheme.
- Click Save to save your custom color scheme settings.
It will appear in the Color Scheme drop-down box.
If you don't save Custom Color Settings and return to one of the four
standard, all your custom configuration will be lost.
Note: these settings will affect control panels of your direct end users
and resellers. Resellers' admin control panels and the control panels of
resellers' end users won't be affected; their look and feel must be configured
from the reseller admin control panels.
|