|
Custom Jobs allow you to track the additional services you offer to your customers. This
could be any type of job such as web design and development, installations, support, or even marketing services.
You can use it to track services you offer both for resellers and end users. Resellers also have
this facility to work with their end users.
Adding Custom Jobs
To assign a Custom Job to a particular account:
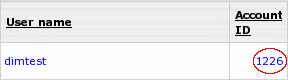
- Click the Account ID to go to the account details:
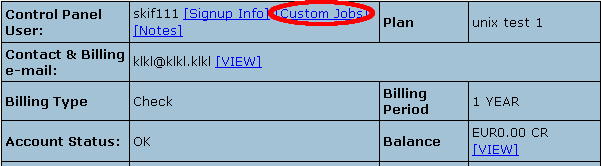
- Click Custom Jobs in the Control Panel User section:
In the bottom frame, the Custom Jobs form will appear.
- Enter the description of the custom job and add it by clicking the button:
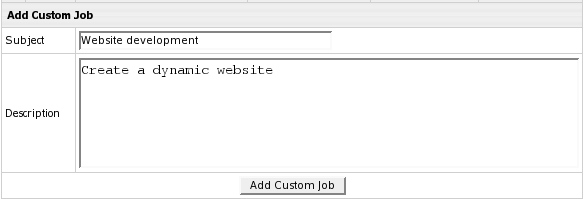
The custom job will appear in the list right above the form you have filled out.
- Click the ID of the custom job you have just created. You will see the details and a
form to add tasks to the custom job.
Adding Tasks to Custom Jobs
A custom job consists of tasks. Task involves its own duration in hours and rate per working hour.
To add a task to a custom job:
- Click the ID of the custom job. The following form will appear:
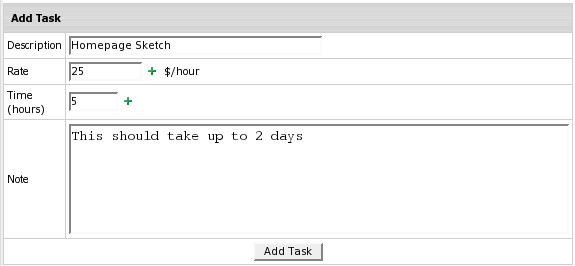
- Description: enter the essence of the task.
- Rate: enter the fee for this task per hour.
- Time: enter time in hours necessary to complete this task.
- Note: optionally, enter note about this task.
Click Add Task. The task will appear above the form.
Optionally, add anote to this custom job in the Add a Note field.
Mind that tasks as well as custom jobs will appear in the user control panel.
This way your customers can see what should be or has been done.
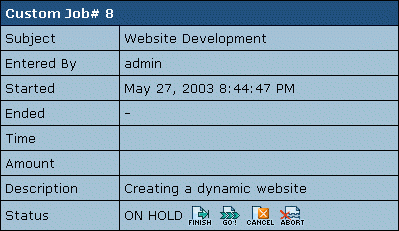
Tracking Custom Job Status
You can use controls to set the status of the custom job.
This status will reflect on the user control panel.
To set status, click the custom job ID on the Custom Jobs page and refer to the Status field:
- Click Finish
 if the job is completely done. It will show as FINISHED on the user panel.
Note: Upon clicking Finish, the corresponding billing entry will
immediately appear in customer's online invoice and user will be charged total
fee for the Custom Job. It will also show the time when the job was completed
in the ENDED field on the Custom Job page.
- Click Start
 to mark the job as active. It will show as IN PROGRESS on the user panel.
- Click Cancel
 to mark the job as stopped. It will show as CANCELED on the user panel.
- Click Abort
 to mark the job as ABORTED. This won't delete the job from the list
- Click On Hold
 to mark the job as pending. It will show as ON HOLD on the user panel.
Custom job entries will be accessible by your customers in Support Center -> Custom Jobs.
|