|
Reports help you monitor accounts in the system, find necessary accounts by specific parameters, and view
details on these accounts.
H-Sphere suggests several search methods, each serving its purposes.
Exporting Reports
Most of the reports (billing balances, estimated balance exhaustion date, charge log,
billing entries and monetary transactions) allow saving the results in the
*.txt format and exporting them to other applications.
To export necessary report results:
- Click the Export link at the bottom of the results page.
- Follow the standard download procedure using the dialog window.
H-Sphere saves report results in the *csv format that is supported by numerous spreadsheet and
database programs. Commas are used as delimiter separators.
Billing Balance
The Billing Balance feature enables you to keep track of
users' balances. You can customize your search by the following criteria:
|
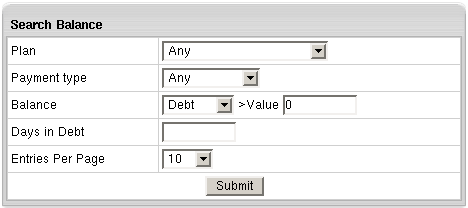
|
- Plan: the plan under which the accounts were created.
- Payment Type: the type of payment for the services provided.
- Balance:
- Debt: defines users with debt.
Important: H-Sphere regards debt as negative balance exceeding credit limit.
- Deposit: defines users with positive balance.
- >Value: the balance threshold. For example,
if you select Debt and set >Value to $10, the search
will retrieve only the accounts with the debt of $10 or more.
- Days in Debt: days in debt that exceeds the credit
limit. If you enter 7, the search will retrieve only accounts
with the debt that appeared 7 or more days ago.
- Entries Per Page: set the number of matching accounts
to be listed at a time on the Search Results page.
|
The results of the search are organized as follows:
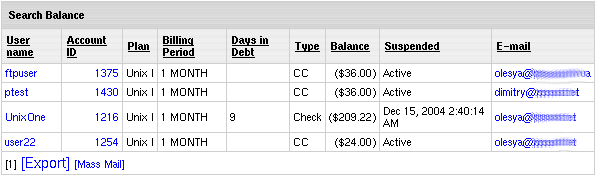
- Account Id: the system ID of the account. Click it to view the account properties.
- Plan: the plan this account was created under.
- B.Period: the frequency of payments for hosting services of this account.
- Days in Debt: days in debt over the credit limit.
If you enter 7,, the search would only show the accounts
with the debt that appeared 7 or more days ago. The empty
cell means that the debt hasn't reached the Credit Limit yet.
- Type: the type of payment.
- Balance: positive balance shows how much the user
has paid in advance (usually when paying by check or canceling
some resources). Negative balance shows how much the user
owes you and is displayed in brackets, e.g. ($104).
You can sort search results by clicking underlined column captions.
The Export link enables you to save the chart data
in *csv format that is supported by numerous spreadsheet and
database programs. Commas are used as delimiter separators.
Estimated balance exhaustion date
From time to time you might need to inform your check users
about when their account balances are likely to become negative.
In other words, let them know when approximately they will
run out of their balance money, in case they will pay off
their outstanding debts and won't purchase any more paid resources.
Use this report tool for these purposes:
From/To: the search will retrieve all the accounts
with estimated exhaustion balance date within the time frame set.
The results of the search are organised in the following way:
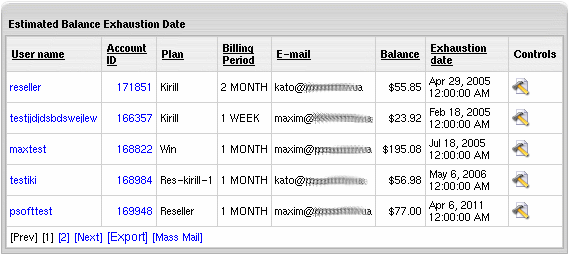
- Account Id: the system ID of the account. Click it to view the account properties.
- Plan: the plan this account was created under.
- Billing Period: the frequency of payments for hosting services of this account.
- Balance: the current agriniamount of money on user's balance.
- Exhaustion date: approximate time when the
user's balance indicated on the left runs out and becomes
zero. This is only true if that user won't buy any more paid resources.
Upon the search results, you can send a mass email
to all users in the report. To do this, click the Mass Mail link
at the bottom of the report page.
Daily Report
The Daily Report feature allows you to keep track of subscribed
users and total signup payments, as well as users that have
canceled their hosting and total refunds.
To keep track of accounts created during a certain period
of time, select Daily Report in the Reports menu.
Set the From/To period and the search will retrieve all the newly created, canceled and failed
accounts grouped by plans and billing periods:
|

|
Report for new hosting shows:
- Plan: the plan under which retrieved accounts were created or canceled.
- Period(month): the duration of the billing period in months.
- Signup pays the total amount of recurrent payments
- 1 year pays: expected annual income from new hosting
Report for canceled and failed hosting also shows:
- number of accounts in the system both under this plan and with
this billing period created or canceled between the requested dates.
- Refunded: refunds for these accounts.
- 1 year losses: deficiency from canceled hosting.
|
Charge Log
To view the messages that H-Sphere exchanged with the Credit
Card Online Processing Center, select Charge Log in
the Reports menu.
Enter Account ID, User name, Plan, Transaction result, Performed on date and run this report.
The retrieved information is organized in the chart with the following columns:
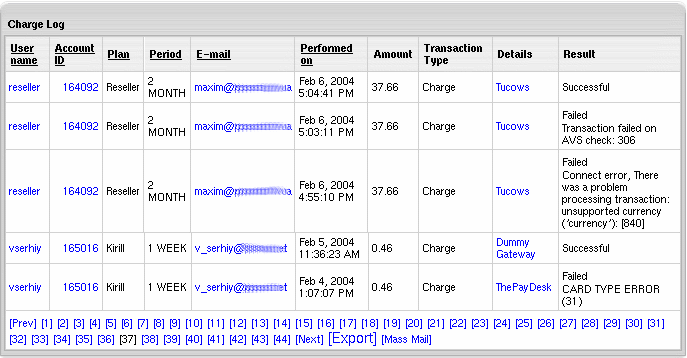
- Account ID: account's system Id.
- Plan: account's plan.
- Period: account's billing period.
- Performed on: the time and the date when the transaction was executed.
- Amount: transaction fee.
- Transaction Type:
- Charge - pay transaction.
- Authorize - request for transaction approval.
- Void - canceled authorize transaction.
- Details: merchant gateway the transaction was processed by.
- Result: transacion confimation / errors for failed transations.
Registrar Log (version 2.4.2 Beta 1 and up)
This report will show all the requests to
domain registrars and responses from them.
Select Registrar Log in the Reports menu, enter search criteria and click Submit.
Enter Domain, Account ID, User, Plan, Transaction result, Performed on date and run this report.
Note: Check the Only Live Users box to exclude canceled accounts from the search.
The retrieved information is organized in the chart with the following columns:

- Domain: the domain name of the site.
- Account ID: account's system ID.
- User: the name of the user who owns the domain
- Transaction Type:
Register: domain registration
Renew: renewing the existing domain registration
Lookup: checking if the domain name the user has chosen already exists
Change password: changing user access info
Change nameservers: changing namservers
- Date: account's billing date
- Period: domain registration period in years
- Details: the domain registrar of the domain involved
- Error message: an error message returned by the domain registrar
- Transaction Result: confirmation of successful or failed transaction
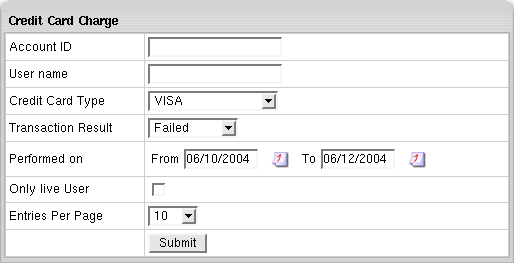
Credit Card Charge
Use Credit Card Charge report to find all, successful or failed credit card transactions
by specified period, credit card type or user.
Enter Account ID, User name, Credit Card Type, Transaction result, Performed on date and run this report.
Billing Entries
The Billing Entries feature allows you to find accounts by
several criteria. Select Billing Entries in the Reports
menu and then enter the search parameters in the form that appears.
Check the Only Live Users box to exclude canceled accounts from the search.
When you submit you query, the billing entries will be shown in the following chart:
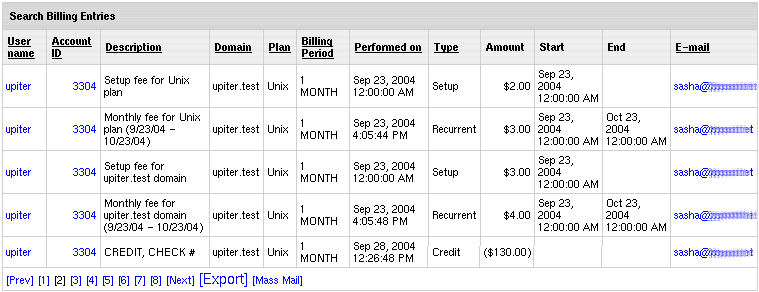
- Account ID: the system ID of the account. Click it to view the account properties.
- Description : billing entry description.
- Domain: the domain name of the site.
- Plan: the plan under which this account was created.
- Billing Period: the frequency of payments for hosting services for this account.
- Performed on: the date and the time when the transaction was performed.
- Type: the type of transaction
- Amount: the amount of transaction. Outflow transactions
are displayed in brackets.
- Start indicates according to the type of transaction
- Setup - the beginning of the billing period.
In this case it coincides with the Performed.
- Recurrent - the beginning of the billing period.
- Usage - the beginning of the billing period.
It coincides with the Performed.
- Refund - the beginning of the billing period.
- Charge - the beginning of the billing period.
- Credit - the beginning of the billing period.
- Moneyback - the beginning of the billing period.
- Debit - the time beginning of the billing period.
|
- End indicates according to the type of transaction -
- Setup - not applicable.
- Recurrent - the time and the date of the end of the billing period.
- Usage - the time and the date of the end of
the billing period. It coincides with the Performed.
- Refund - the end of the billing period.
- Charge - not applicable.
- Credit - not applicable.
- Moneyback - not applicable.
- Debit - not applicable.
|
Each transaction is represented in a separate billing entry.
You can sort them by clicking underlined column captions.
Note: If in 2.4.2 beta 3 you install the additional reports as a package, the current Billing Entries
report will be replaced with the one that comes with the package.
Monthly Revenue
To view the financial report on each month, select Monthly
Revenue in the Report menu. The page that opens
presents data in the following table:
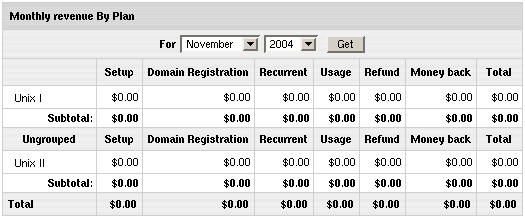
- the first column presents plans grouped by their compatibility.
- Setup: the total signup payments for the accounts
registered under this plan during the selected month;
- OpenSRS: the gross amount received for domain name
registration with OpenSRS. For example, if you charged users
the total of $300, while your payments to OpenSRS were $280,
the table will show $300.
- Recurrent: the total recurrent payments for this
month. For example, if a user selected a 6 month billing
period and was charged the recurrent fee at the beginning
of the first month, all this amount will be included in
the first month; the remaining five months will show zero
recurrent payments.
- Usage: the total usage payments for this month.
For example, if a user selected a 6 month billing period,
he would be charged at the end of the last month; all this
amount will be included in the last month's usage fee, and
the reaming five months will show zero usage payments.
- Refund: the total amount of money refunded during this month.
- Money back: the total amount of money returned
to the users who claimed their money back during the Money Back period.
- Total: overall money received for the month.
Monetary Transactions
Choose Monetary Transaction from the Reports
menu. Combine Account Id, Username, Plan and Created
search criteria to retrieve monetary transaction statistics
organized in chart which consists of the following columns:
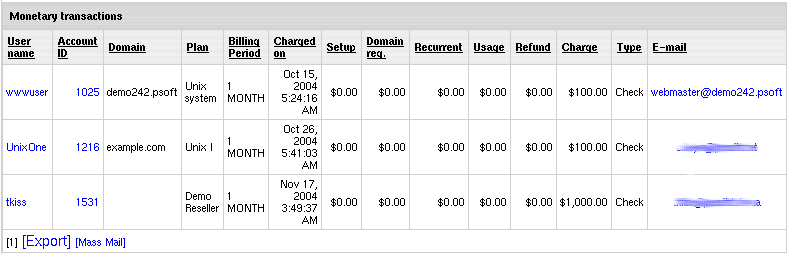
- Username: user login.
- Account Id: account's unique system Id number.
- Domain: domain name.
- B.Period: account's billing period.
- Charged on: the time and the date the sum indicated
in the Charge column was charged.
- Setup: setup fee accrued.
- Domain reg.: OpenSRS domain registration fee accrued.
- Recurrent: recurrent fee accrued.
- Usage: usage fee accrued.
- Refund: refund accrued.
- Charge: final amount charged. This amount is the
sum of all accrued fees and current negative balance less the refund.
- Type: type of payment /*CC stands for credit cards/.
Each row in the chart represents an invoice for a separate payment. You can sort entries by clicking underlined column captions.
The Export link enables you to save monetary transaction statistics in the *.csv format that is supported by numerous
spreadsheet and database programs. Commas are used as delimiters.
Transfer Traffic Report
To generate report by overall traffic generated over the specified period of time:
- Select Transfer Traffic in the Reports menu.
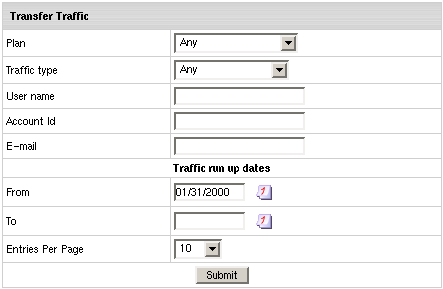
- Enter Search criteria
- Traffic Type: overall traffic or specific transferred (HTTP, FTP, mail, Real Server) traffic.
- Plan, username, account ID and email are explained above.
- Click Search.
Report shows a list of users matching your search criteria, plan they are signed
up under, email and transfer traffic consumed over the specified period.
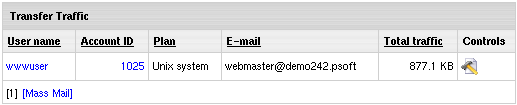
By clicking the Edit icon in the Controls section, a login page shows
and you will be able to login into this account.
Note: Upon retrieving a report, you can send a mass email to
all users displayed in the report. To do this, click the Mass Mail link
at the bottom of the report page and send a message.
Traffic reading in this report is different from the Summary Traffic in the
user control panel, as it shows traffic for the period defined in the search
criteria, whereas the user control panel shows traffic consumed during the
current traffic cycle wich is one month.
Disk Usage Report
This feature allows you to retrieve data about disk space consumed by users
over a specified period of time. The obtained numbers don't reflect the state for this
moment in time. They show disk space usage averaged for the selected time period.
To get the latest registered disk usage, limit your search to one day only.
To generate a report, do the following:
- Go to the Reports menu in your admin control panel.
- Select Disk Usage. The following page will show:
- Enter Search Criteria:
- Usage Type: overall disk usage or disk space consumed on specific (mail, web, DB) server.
- Plan, username, account ID and email are the same as for other reports.
- Click Search.
On the page that shows, you can see a list of users, their accounts that match your search criteria, plans
they are signed up under, emails and disk usage consumed during the mentioned period.
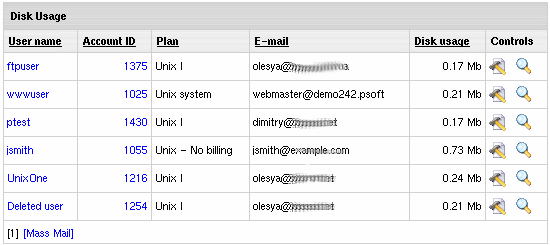
Clicking the Edit icon in the Controls
section you are taken to the page from where you can login into selected account.You
can also use this feature as a search utility to find account by disk space
used for a period of time.
Note: Upon the search results, you can send a mass email to all users displayed
in the report. To do this, click the Mass Mail link at the bottom of the report page.
Reseller Traffic Report(version 2.3 and higher)
This feature allows you to retrieve data on transfer traffic consumed by resellers
and/or users of the reseller. This report is available only to admins. To do this:
- Select Reseller Traffic in the Reports menu. The following page will appear:
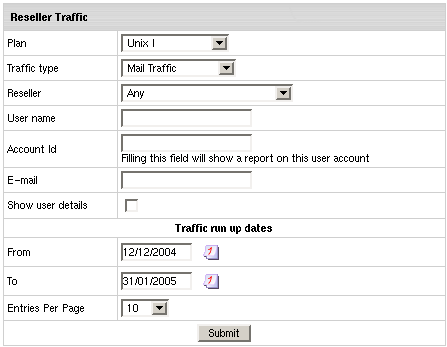
- Enter search criteria:
- Traffic Type: overall traffic or specific transferred (HTTP,
FTP, mail, Real Server) traffic.
- Reseller: choose a name of the reseller.
- Plan, username, account ID and email are explained above.
- Click Search.
With 'Show user details' checked, the result page
will show traffic used by the customers of the reseller. With this box
unchecked, it will show report on traffic used by resellers only.
Note: Upon the search results, you can send a mass email to all
users displayed in the report. To do this, click Mass Mail at the bottom
of the report page.
In Resellers Disk Usage Report
(version 2.3 and higher)
This feature allows you to generate a report by the amount of disk space that
reseller's users consumed over a specified period of time. This report is available
only to admins. To generate a report:
- Go to the Reports menu in your admin control panel.
- Select Reseller's User Disk Usage. The following page will show:
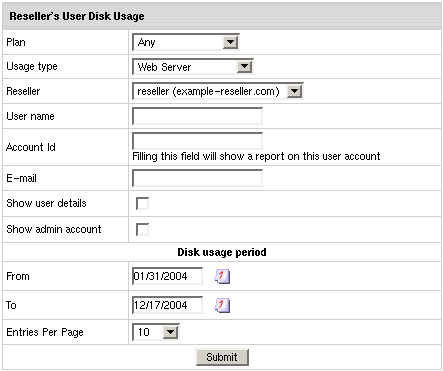
- Enter Search Criteria :
- Usage Type: overall disk usage or disk space consumed by specific (mail, web, DB) server.
- Reseller: choose a name of the reseller.
- Plan, username, account ID and email are explained above.
- Click Search.
Note: if you check the "Show user details" box, the result page
will show disk space used by customers of reseller. If you leave this box
unchecked, you will get a report on disk space used by resellers in general.
Note: Upon the search results, you can send a mass email to all
users displayed in the report. To do this, click the Mass Mail link at
the bottom of the report page.
IP Addresses Report(version 2.3 and higher)
To find necessary IP addresses or have them sorted by different criteria, do the following:
- Go to the Reports menu in your admin control panel.
- Select IP Addresses
- Enter Search Criteria of IP addresses:
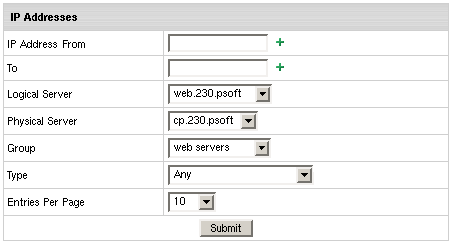
- Click Submit
- The following results will show:
- ID of logical server
- Logical server host name
- Host IP
- IP Type (Status)
- Additional Info
Note: For Busy Dedicated IP
info shows the domain name hosted on it, and for Busy DNS Reseller IP also the name of the reseller.
CC Processing Errors Report(version 2.3 and higher)
This feature allows you to generate a report on failed credit card attempts
to be connected or charged by credit card processing center. This report is
available only for credit pay users. To generate a report, do the following:
- Go to the Reports menu in your admin control panel.
- Select CC Processing Errors.
- Enter Search Criteria:
- State of the account, plan, username and account ID
are mentioned above.
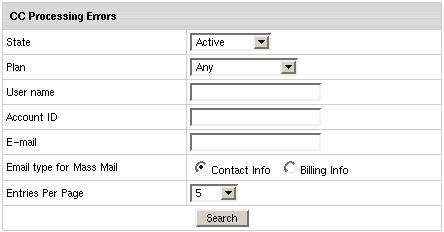
- Click Submit.
Note: Upon the search results, you can send a mass email
to all users in the report. To do this, click the Mass Mail link
at the bottom of the report page.
Content Move(deprecated in all 2.4 and higher)
To make a report on Content Move:
- Go to the Reports menu in your admin control panel.
- Select Content Move.
- Enter search criteria.
- Click Search.
Reports Installed in a Package
(version 2.4.2 Beta 3 and higher)
To use additional reports:
- Install the package as suggested in our instruction on
Installing H-Sphere Packages.
Note: Upon installing the package, the built-in Billing Entries
report will be replaced with the one that comes with the package.
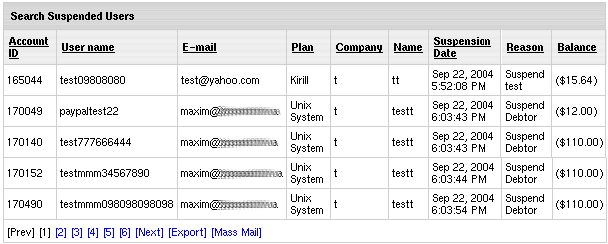
Suspended
This report shows info about suspended accounts by reason, date and user info.
Enter Payment type, Plan, User name, Account ID, Registration Date, Suspention date and run this report.
The search result will be similar to the following:
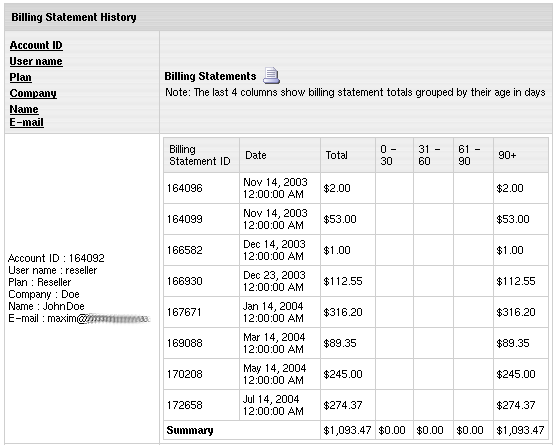
Billing Statement History
This report shows account activity: billing statement totals, additionally grouped by billing statement ID and age in days.
Enter Payment type, Plan, User name, Account ID, Registration Date and run this report.
The search result will be similar to the following:
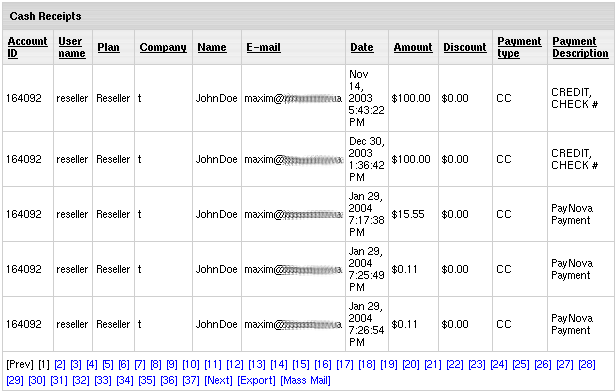
Cash Receipts Report
This report shows info about payments and credits by payment type, amount and date.
Enter Payment type, Plan, User name, Account ID, Date of payment and run this report.
The search result will be similar to the following:
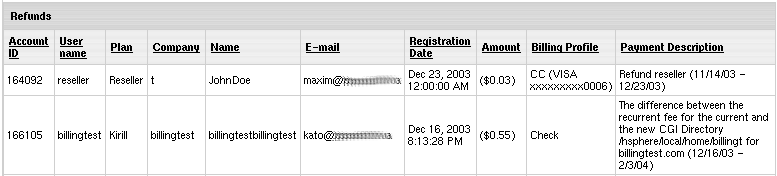
Refunds
This report allows getting information on all refunds addressed to your users by refund description, billing profile, amount etc.
To run a report, enter parameters for Payment type, Plan, User name, Account ID, Date of refund.
The search result will be similar to the following:
Billing Statements
This report shows billing statements ID, status, amount (of all billing entries in the billing statement) that includes refunds.
Enter Payment type, Plan, User name, Account ID, Performed on and Registration Date and run this report.
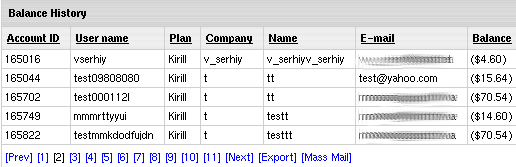
Balance History
This report shows what was the account balance for a certain user for a certain date.
Enter Payment type, Plan, User name, Account ID, Performed on date and run this report.
The search result will be similar to the following:
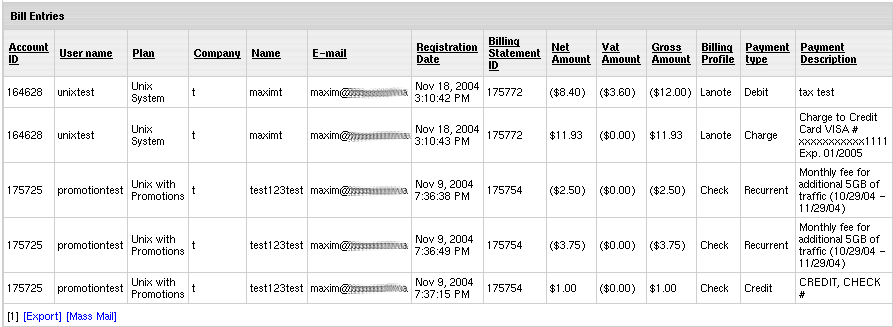
Bill Entries
This report lists billing entries along with payment type, billing profile, billing statement ID for all accounts.
Enter Payment type, Plan, Transaction Type, User name, Account ID, Performed on date and run this report.
The search result will be similar to the following:
Note: Upon installing the package, the built-in Billing Entries
report will be replaced with the one that comes with the package.
|