|
Instant Alias Templates are used to generate Instant Aliases,
temporary addresses providing immediate access to users'
domains from the Internet. They are usually helpful when the
DNS servers worldwide are being refreshed and the site is
temporarily unavailable at the regular domain name.
Creating an instant alias template will automatically add one or more
A-DNS records to your service zone. These records resolve
all your logical servers.
Adding Instant Alias Templates
To add instant alias, do the following:
- Select DNS Manager in the E.Manager menu:
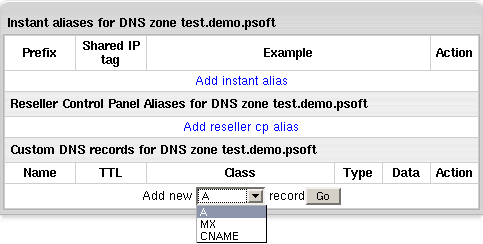
- Click the EDIT icon to go to the DNS zone management page. The following
page appears:

- To add an instant alias template, click the Add instant alias
link. This will open the following form to fill out:

- Prefix: instant alias prefix that will appear on the
left to the domain part in user's instant domain alias.
Different prefixes should be set if you use different
shared IP tags. Other than that, it is recommended to
use one and the same prefix (e.g. u for all
instant alias templates).
- Shared IP tag: a digital "mark" that
helps separate sites within one plan on one logical server.
All sites located on the same logical host under the same
plan are usually assigned to the same shared IP. This feature
allows to give a different shared IP to a group of sites
of, say, explicit nature. This may become necessary as many
corporate firewalls filter sites based on their IP, not
the domain name.
Normally, you are expected to have devoted one IP address
for each shared IP tag. To use a shared IP tag, you need
to have it defined for every logical host.
Go to the LServers section for instructions.
Numbers 10 to 99 are acceptable. The default value of 2
is assigned when the field is submitted being empty.
Click Submit. You will be taken back to the list of instant aliases
with the new instant alias template added to the list.

Editing Instant Alias Templates.
Once an Instant Alias is created, the system adds all necessary A DNS records to this DNS zone.
To view these DNS records, cilck the Edit button near the necessary Instant Aliases:

The upper part of the table lists the existing DNS A records in the selected DNS zone.
To delete DNS records, click the Trash icon.
The lower part of the table appears only when the DNS zone does not contain A records
for some logical servers. It lists these logical servers with their IP's.
To add a logical server to the DNS zone, click the Add button. You can add all these servers
to the DNS zone by clicking the Add records to all listed logical servers link at the bottom of the table.
If the IP address with the specified shared IP tag doesn't exist on one or more logical servers, you will get the
corresponding message on the instant alias properties page.
If you see this message, add a shared IP with this shared IP tag to the listed logical servers.
Go to the LServers section for instructions.
To delete Instant Alias Template, click the Trash icon next to the corresponding alias.
|