|
By logical servers we mean the software that runs on physical servers and processes client requests.
Adding Logical Servers
Before you begin adding a logical server to H-Sphere, make sure to have:
- the physical server added to H-Sphere configuration;
- the logical server software
installed.
To add a new logical server to H-Sphere, do the following:
- Go to your admin control panel.
- Click Add L.Server in the E.Manager menu.
- On the page that appears, enter the properties of the logical server:
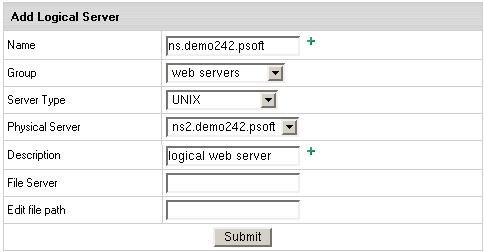
- Name: The domain name of the logical server;
- Group: The group of logical servers you are adding this server to.
- Type: The type of the server.
- Physical Server: The box where the logical server is installed.
If nothing is available in the dropdown box,
add this server group to the physical server first.
- Description: The note that will help you identify this server among others.
- File Server: Reserved for future implementation.
- File Path: Reserved for future implementation.
- Add DNS records for this logical server, as suggested in the DNS Configuration guide.
- If you are adding a web server, select Shared SSL Manager in the E.Manager menu,
click the Edit icon next to the domain name and enter the certificate key and certificate file
in the Install completely new certificate key and file pair boxes. Then click the Upload button.
This will update the shared SSL certificate installation on all servers, including the newly installed one.
Enabling User Signup on Logical Servers
By default, customer signup is disabled on new logical servers. Sometimes
you may want to keep it disabled to provide dedicated servers to individual
customers or to prevent them from getting overloaded. In most cases, however,
you would need to turn it on.
To enable user signup:
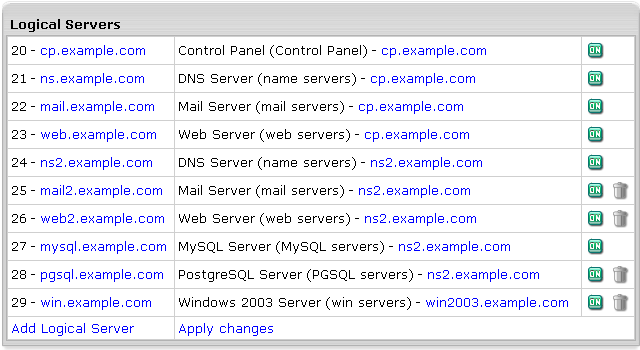
- Select L.Servers in the E.Manager menu.
- You will be taken to the list of all logical servers
in the system. Click the server you would like to edit:
- Starting with H-Sphere 2.4 Beta 7, on the page that appears, turn on the Available for signup option.
Logical Server Additional Options
Once logical server is added, you can set additional options for it.
Additional options are available for webservers, mail servers and DNS servers.
To set additional options, click the logical server name in the list of
all logical servers and scroll down to the bottom of the page.
Webserver additional options:

You can set the following for the webserver:
Miva Merchant version: this option allows setting correct extensions prior to installation:
.mv for v. 4.12 and older and .mvc for v.4.14 and later.
Unix user home directory: enter home directory if necessary.
Make sure to click Set to apply changes.
DNS server additional options:
Additional options in DNS logical server allows assigning master and slave roles
to DNS logical servers and limiting resellers to particular DNS logical servers.
For detailed information, read about DNS Servers.
Mail server additional options:
Additional options in mailserver allows changing the role of a mail server at the system level.
For detailed information, read about Mail Server Roles.
Removing Logical Servers
To remove a logical server:
- Make sure no accounts, mail domains, web sites or other resources are run on it.
- Delete all the IPs designated to it (E.Manager ->
L.Servers -> 'selected logical server' page).
- Click the Delete icon which will then appear in the Usage field.
|