|
Starting with version 2.3, H-Sphere comes with a Domain Registrar Manager. It
supports automatic domain registration services with multiple domain registration providers.
This document provides step-by-step instructions on how
to:
IMPORTANT:
1. Before you start, make sure to have your company info carefully
entered, as it will be used as Billing and Tech info for registered domains. With your
company info incorrect or incomplete, end users may start encountering problems with
domain registration. Company Info is set on the Look&Feel; -> Company Info page.
4. Starting with version 2.3.1 beta 4, H-Sphere supports .US, .CA, .INFO, and .BIZ domains.
Supported domain registration providers require that registrant phone and fax numbers
be entered in a special format.
Users registering .US and .CA domains are also asked for additional information.
Phone/fax format depending on the country of residence:
- North America: NXX-NXX-XXXX/YYYY;
- Other countries: +CCC.ZZZZZZZZZZ/YYYY.
Here:
N is a digit from 2 to 9,
X any digit,
YYYY optional extension,
CCC country code,
ZZZZZZZZZZ phone/fax number inside the country.
Administrators/resellers should also change the format of phone and fax numbers
in their Company Info pages.
Step 1. Creating Connections with Domain Registrars
- Log into your admin CP.
- Select Domain Registrar in the Settings menu.
- Create connections for
Enom,
OpenSRS, Alldomains,
OnlineNIC, DirectI,
RRPproxy or Email Domain Registrar.
Step 2. Associating Top Level Domains with Domain Registrars
Now that you have created connections with domain registrars, you need to
associate it with each TLD (top level domain). If you have registered connections
with both registrars, you can have some TLD's registered with one and others with another.
For example, you can configure H-Sphere to register .com and .net domains
with OpenSRS, and others - with Enom. To set the associations:
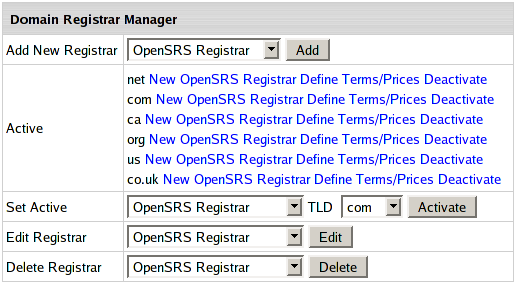
- In the Set Active field, choose the TLD and the registrar it will be registered with.
- Click the Activate button to create the association. Now your Domain
Registrar Manager form should look similar to this:

Make sure to create associations for each TLD you would like to support. Users won't be able
to register domains with inactive TLDs from their control panels.
Step 3. Setting Default Domain Registration Prices
Requirements: Enom and/or
OpenSRS configured.
You can set different domain registration prices in different plans. However,
you first need to set default domain registration prices to be applied every time a
plan-specific price hasn't been specified.
- Log into your admin CP.
- Select Domain Registrar in the Settings menu.
- In the Active box, choose the top level domain (.net,
.com, etc.) and click the Define Terms/Prices link next to it.
- Set the default prices for various periods:

These are actual prices for the billing periods, they are not prorated to
one year. This means, you need to enter "15 30 45 60 75 90 105 120 135 150",
not "15 15 15 15 15 15 15 15 15 15".
- Repeat steps 3-4 for each TLD.
- Now that you have entered default prices,
set domain registration prices for individual plans.
Warning: If you don't set default or plan-specific prices, end users won't
be able to register domains from their control panels.
Step 4. Configuring Registrar Connections for Resellers
Resellers offer domain registration services using your registrar connections.
In other words, once you have correctly completed the above steps, your registrar
connections will become available in the resellers' admin control panels. Also, please:
- Ask your resellers to check that their company info is correctly entered
(no fields should be left empty), as it will be used as Billing and Tech info
for registered domains. With reseller company info incorrect or incomplete,
resellers' end users may start encountering problems with domain registration.
Company Info is set in the reseller admin CP on the Look&Feel; -> Company info page.
- Make sure to enter prices for TLDs and year periods you would like to offer
through resellers. These could be either default prices (see the previous step)
or plan-specific prices (see Plan
Wizards, step 2, or both.
Editing Registrar Connection Settings
- Log into your admin CP.
- Go to Settings -> Domain Registrar.
- Choose domain registrar account from the Edit Registrar drop-down box
and click the Editbutton.
Removing TLD Associations
When you remove a TLD association, the TLD becomes unavailable for end users' domain
registration. This, however, doesn't remove the registrar account. To remove a TLD
association:
- Log into your admin CP.
- Go to Settings -> Domain Registrar.
- Click the Deactivate link for the TLD association.
Deleting Registrar Connections
- Log into your admin CP.
- Go to Settings-> Domain Registrar.
- In the Delete Registrar drop-down box, choose the domain name registrar
and click the Delete button.
|